
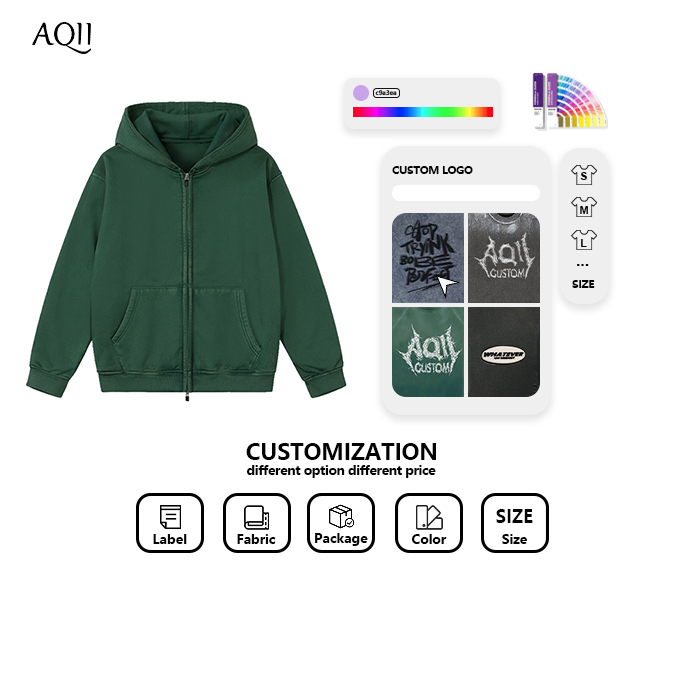
A fashion journey from initial acquaintance to mutual benefit
As a professional streetwear customization factory, we often carry out designer interview projects. By communicating with current fashion designers, we can understand some problems they encounter during design and production, and also discover some trends to help us achieve better development.
A few days ago, we visited a designer in Germany who has over 100,000 followers on Instagram. The main topic was about "How to custom hoodies at home".
If you want to know how designers customize hoodies at home, you can check out the following article information to learn more information. I hope it can be of help to you.
Meanwhile, if you need to customize hoodies, you can also seek professional Clothing customization factories, such as us, Hangzhou Aiqi Clothing. Just tell us your ideas about customization, and we will do everything for you.
I believe anyone can learn how to custom hoodies at home. I have seen that you do not need fancy skills to make a custom hoodie. You can start with a blank hoodie and use decoration techniques, or sew a hoodie from scratch if you want a bigger challenge. I often use online design tools like Adobe Express, Creative Fabrica, and Printful. These platforms let me experiment with custom graphics, fonts, and colors before I print or apply them. With a Cricut machine or embroidery, I can add even more custom touches. When I follow the right steps, I always get a hoodie that looks professional. If you wonder how to custom hoodies, I can show you how to custom hoodies with the tools and tips I use every day.
Pick the right hoodie base by thinking about material, fit, and color. This helps you feel comfortable and get the best design. Plan your hoodie design with sketches, measurements, and online tools. This helps you avoid mistakes and see your idea clearly. You can use the no-sew method with decoration or sew a hoodie from scratch. This lets you make a custom hoodie that matches your style. Try different ways to decorate like heat transfer vinyl, embroidery, or screen printing. These methods help you add special and lasting designs. Always heat-set your design and follow the right washing and care steps. This keeps your custom hoodie looking new for a long time. Add final touches like labels and special details. This makes your hoodie look professional and helps it stand out. Test your design and where you put it before you finish. This helps you get clean lines and avoid expensive mistakes. Share photos of your custom hoodie on social media and join groups. This lets you get feedback and inspire other people.
When I start a custom hoodie project, I always pay close attention to the base. The right hoodie base makes a big difference in comfort, style, and design results. I look at three main things: material, fit, and color.
Choosing the right material is the first step. The fabric affects the feel, durability, and how well the design shows up. I always ask myself what I want from my hoodie—softness, warmth, or stretch.
Cotton feels soft and breathable. I like cotton for daily wear because it is comfortable and gentle on the skin. Cotton hoodies absorb moisture, but they can shrink if I do not pre-wash them. I notice that cotton wrinkles easily, so I handle it with care. Cotton is often the best fabric for hoodies when I want comfort and a natural feel.
Polyester is a synthetic fiber. It stands out for its durability and moisture-wicking ability. I use polyester hoodies for sports or outdoor activities. They resist wrinkles and keep their shape well. However, polyester does not breathe as well as cotton and can hold onto odors. I find polyester hoodies last a long time and keep their color after many washes.
Blended fabrics, like cotton-polyester, give me the best of both worlds. These hoodies feel soft and comfortable, but they also resist wrinkles and last longer. I often choose blends for custom projects because they are easy to care for and work well for printing. The best hoodies for printing usually use blends, as the fabric holds designs well and stays looking sharp.
Tip: I always check for sustainable options like organic cotton or recycled polyester. These materials help reduce environmental impact and still offer great quality.
Material | Warmth | Breathability | Durability | Stretch | Use Case |
|---|---|---|---|---|---|
Cotton | Medium | High | Moderate | Low | Casual, daily wear |
Polyester | High | Medium | High | Medium | Sports, outdoor |
Cotton-Polyester | Medium | High | High | Medium | Versatile, printing |
The fit of a hoodie changes how it feels and looks. I always try on different fits to see what works best for me
Getting the right size is important for comfort and style. I check the size chart before I buy a blank hoodie. A hoodie that fits well feels better and looks more polished. I notice that unisex hoodies with a relaxed fit work for many body types. They feel comfortable and look good on almost everyone.
Hoodies come in slim, regular, and oversized fits. Slim-fit hoodies look modern and neat, but they can feel tight. Regular-fit hoodies suit most people and give a classic look. Oversized hoodies feel extra cozy and give a trendy, streetwear vibe. I like to match the fit to my personal style and the look I want.
Hoodie Fit Type | Best For | Comfort | Style Impact |
|---|---|---|---|
Lean, athletic | Sleek, snug | Modern, streamlined | |
Regular Fit | Most body types | Balanced | Classic, versatile |
Oversized Fit | Tall, larger frames | Very roomy | Bold, trendy |
Color choice affects both style and how the design stands out. I always think about the final look before picking a color.
Light colors like white, cream, or light gray make designs pop. When I print on a white hoodie, the colors look bright and bold. Light colors are the best hoodies for printing if I want my design to stand out. I also find it easier to match light hoodies with different outfits.
Dark colors like black, navy, or charcoal give a sleek look. Designs with light ink or vinyl show up well on dark hoodies. I use dark hoodies for a more subtle or classic style. Sometimes, prints look more muted on gray or dark fabrics, so I plan my design colors carefully.
Note: I always pre-wash my hoodie fabric before decorating or sewing. Pre-washing stops shrinkage and keeps the fit right. It also removes extra dye and dust, which helps the design stick better and look cleaner.
When I choose a hoodie base, I think about material, fit, and color together. This helps me get the best quality and results for my custom hoodie. If you wonder how much does it cost to make a custom hoodie, remember that higher quality materials and better fits can raise the price, but they also make the hoodie last longer and look better.
When I start a custom hoodie, I always plan my design carefully. Good planning helps me turn my hoodie design ideas into a real product that fits well and looks great. I use a mix of sketching, measuring, and digital tools to make sure every detail is right.
Sketching is my favorite way to bring hoodie design ideas to life. I use both paper and digital tools to map out my vision.
I begin by drawing the front view of the hoodie. I look at market trends, think about my personal style, and consider the occasion. Sometimes, I get inspired by art or pop culture. I use simple lines to show where I want graphics, text, or patterns. I pay attention to the chest, sleeves, and pockets. I make sure the design stands out and matches the color of the hoodie.
Next, I sketch the back view. I decide if I want a large graphic, a small logo, or just a clean look. I check the placement and size of each element. I often use a Hoodie Design Pack to try different layouts and layers. This helps me add depth and personality to my hoodie. I also think about reversible designs for more versatility.
Tip: I always use digital tools like Design Lab to test colors and finalize my design before moving forward.
Accurate measurements make sure my hoodie fits just right. I never skip this step.
I use a measuring tape to check my chest, shoulder width, and body length. I compare these numbers to the size chart from the hoodie manufacturer. I also look at an old hoodie that fits me well. This helps me choose the best size and avoid mistakes. If I want a slim fit, I might size up. For an oversized look, I stick to my true size.
I measure the hood opening and depth. I want the hood to feel comfortable and not too tight. I check the size chart for hood measurements, too. If I make a hoodie for a group, I ask for samples or do fittings to make sure everyone gets the right fit.
Note: I always allow for a little shrinkage, especially if I use cotton fabric.
Digital tools help me see how my design will look before I make the hoodie. I use them to place your design on the product and check every detail.
Canva is easy to use. I upload my sketches or graphics and drag them onto a hoodie template. I can change colors, add text, and move things around until I like the result.
Printful lets me create realistic hoodie mockups. I pick the hoodie style, upload my design, and see how it looks from every angle. I use Printful to order samples and check print quality before making more hoodies.
Adobe Express gives me more control over my design. I use it to adjust colors, add effects, and export high-quality images. I like that I can save my work and come back to it later.
I sometimes use Pacdora or Recraft for even more options. Pacdora has a big library of hoodie styles and lets me customize lighting and backgrounds. Recraft uses AI to make unique, realistic hoodie mockups fast. Both tools help me visualize my hoodie and make sure it matches my vision.
Planning my hoodie design step by step helps me avoid mistakes and get the best results. I always take time to sketch, measure, and use online tools before I start making my custom hoodie.
When I want to make a custom hoodie, I choose between two main methods. Sometimes I start with a blank hoodie and decorate it. Other times, I sew a hoodie from scratch. Both ways let me create a unique look and show off my style. I always focus on quality and take my time with each step. Here is how I approach both methods.
If I want to make a custom hoodie quickly, I use the no-sew method. This works best when I have a blank hoodie and want to add my own design or print.
I start by picking a high-quality blank hoodie. I look for softness, durability, and warmth. I avoid low-quality hoodies because they do not last and can ruin my design. I check the fabric composition and weight. A good hoodie base helps my print look sharp and last longer.
Tip: I always prepare a clean workspace with good lighting. I keep all my supplies close by so I do not get distracted.
Now I add my custom touches. Here are the steps I follow:
I plan my design and make sure the file is high resolution and in the right format.
I use tools like Cricut, iron-on vinyl, or fabric paint to create my print.
I test my print on a scrap piece of fabric first. This helps me avoid mistakes.
I place my design on the hoodie and double-check the placement.
I follow the instructions for my chosen method. For vinyl, I use a heat press or iron. For paint, I let it dry and then heat-set it.
I let the print cure for the recommended time. Rushing this step can ruin the quality.
Note: I always follow safety rules and keep my area well-ventilated when using chemicals or heat.
When I want to learn how to custom hoodies from the ground up, I sew my own. This method takes more time, but I get full control over every detail. I can choose the fabric, fit, and every part of the design.
First, I gather my materials:
2.5 yards of sweatshirt fleece knit fabric with at least 10% stretch
1/4 yard rib knit fabric for cuffs and waistband (30% stretch)
Eyelet kit and mallet
36" shoelace for the drawstring
Printed sewing pattern (I find free or paid patterns online)
Sewing machine, thread, scissors, chalk pen, and clips
Here is how I start:
I print the hoodie pattern and tape the pieces together.
I lay out my fabric and place the pattern pieces on top.
I trace the shapes with a chalk pen and cut out each piece.
I prepare the sewing machine with matching thread.
Next, I sew the pieces together:
I insert eyelets on the hood using the eyelet kit and mallet.
I sew the hood pieces right sides together along the curved edge.
I fold and stitch the casing for the drawstring on the hood.
I thread the shoelace through the casing.
I prepare the front pocket and sew it onto the front piece.
I sew the shoulder seams of the front and back pieces.
I attach the sleeves by matching the center of the sleeve to the shoulder seam and pinning them in place.
Now I finish the hoodie:
I sew the underarm and side seams in one continuous line.
I fold the rib knit fabric for the cuffs and waistband, then sew them to the sleeve hems and bottom edge. I stretch the fabric as I sew to get a snug fit.
I attach the hood to the neckline, making sure the notches line up.
I overlock all seams to keep the edges neat and strong.
I pass the cord through the hood casing and knot the ends.
I check all seams and trim any loose threads.
Tip: I always test my print or design on a scrap before adding it to the finished hoodie. This helps me avoid costly mistakes.
When I make a custom hoodie, I focus on every detail. I use high-quality materials and take my time with each step. I avoid rushing the print curing process and always double-check my design files. I keep my workspace clean and organized. I know that these steps help me achieve a professional result every time.
When I design a hoodie, I think about what makes it special. I look at what is popular and try to add my own ideas. I focus on three things: graphics, text, and where to put them.
Graphics give a hoodie its style. Some people use floral chest embroidery for a soft look. Others add stitching on the sleeves or hood for more detail. Pop culture collages and cartoon characters are also popular. Vintage band graphics catch my eye too. I like to use bright colors and clear artwork. Geometric shapes and color blocking make the hoodie look modern. Simple logos with clean lines look classy. I always check that my graphics are sharp and different. A good print makes a hoodie look cool and special.
Floral chest embroidery
Sleeve or hood detail stitching
Pop culture collages
Illustrated characters
Vintage band-style graphics
Minimal logos
Geometric patterns
Color blocking
Tip: I use digital mockups to see my graphics on the hoodie before printing.
Text can make a hoodie stand out. I use big letters and bold words for a strong look. Book quotes, jokes, and positive sayings work well. I try different fonts, like typewriter or handwritten, to match my design. Monograms and initials make it personal. I always make sure the text is easy to read and fits the style. Short slogans or special dates make a hoodie feel unique.
Statement typography with bold fonts
Literary quotes in unique fonts
Monograms and initials
Motivational or awareness messages
Vintage and handwritten styles
Where I put the design is important. I think about the best spot for the print. The front and back are classic places. Sleeves, hoods, and pockets are fun options too. I keep the main design in a clear spot so it does not look messy. Big art on the back or a small logo on the chest can change the look. I use templates or stencils to test where things go. Good placement makes the hoodie look better and helps the design pop.
Front: Good for main graphics or text
Back: Great for big, bold art
Sleeves: Nice for detail stitching or small prints
Hood: Adds a surprise touch
Pockets: Good for small logos or graphics
Note: I always stick to one main idea so the hoodie looks neat and stylish.
Cricut machines and heat transfer vinyl help me make custom hoodies at home. I like this way because it is simple and the designs last. I use it for small projects or when I want something special.
I start by making my design in Cricut Design Space. I pick bold, simple shapes because they cut better. The Cricut Maker with a rotary blade cuts very well. I put the vinyl on the mat and let the machine cut it. Glitter vinyl shines, while matte or glossy vinyl gives other looks. I pull away the extra vinyl, leaving just my design.
Disadvantages of HTV | |
|---|---|
User-friendly and easy to use, suitable for beginners | Best suited for simple, bold graphics; limited detail for complex designs |
Durable and flexible designs that withstand washing and wear | Requires precise cutting; imperfect cuts can ruin the design |
Wide variety of colors and textures (matte, glossy, glitter, reflective) | Not efficient for large orders; time-intensive for bulk production |
After cutting, I put the vinyl on the hoodie. I use a heat press or iron to stick the design on. I follow the right time for each vinyl type. Heat n bond helps hold fabric layers if I add patches. I let the print cool before peeling off the top sheet. Sometimes, I sew around the design for more texture and strength. This way works best for one or a few hoodies. I do not use it for big orders because it takes longer.
Tip: I always test my print on a scrap before putting it on the real hoodie.
Embroidery makes a hoodie feel fancy and textured. I use it when I want my design to last and look nice. It takes more time, but the result is worth it.
I start by picking a stabilizer. This backing keeps the fabric from moving or bunching up. I choose a stabilizer that matches my hoodie’s fabric. I put the fabric and stabilizer in a hoop. This step helps the embroidery look neat.
Next, I set up my embroidery machine or get my needle ready. I pick thread colors that fit my design. I use flat embroidery for a smooth look or 3D embroidery for raised designs. I follow the pattern and make sure the stitches are tight and even. I cut off loose threads and take out the stabilizer when I finish. I check the design for any mistakes. Embroidery works well for chest logos, sleeve details, or big back art. I always use good thread and fabric for the best look.
Pick the hoodie and design.
Choose thread colors and embroidery style.
Hoop the fabric with stabilizer.
Stitch the design and check for even stitches.
Cut threads and remove stabilizer.
Check and finish the hoodie.
Note: Embroidery adds texture and a fancy feel to any custom hoodie. I use it for logos, names, or detailed art.
Screen printing is my favorite way to make bold, long-lasting prints on a hoodie. I use this method when I want my design to look sharp and professional. The process takes some setup, but the results always impress me.
I start by gathering all the equipment I need for screen printing. My workspace must be clean, well-lit, and organized. I use a computer with design software to create my print. I always make sure my design uses solid shapes and clear lines. This helps the print look crisp on the hoodie.
Here is my setup process:
I create my design on the computer. I use programs like Adobe Illustrator or Canva.
I print the design onto a transparent film using an inkjet printer.
I coat a screen with photosensitive emulsion. This emulsion reacts to UV light.
I let the screen dry on a rack in a dark space.
I place the transparent film with my design on the screen.
I use an exposure unit to shine UV light onto the screen. The light hardens the emulsion except where my design blocks it.
I rinse the screen with water. The areas covered by my design wash away, leaving a stencil for the print.
I tape the edges of the screen to stop ink from leaking.
Tip: I always double-check that my screen lines up with the hoodie before I start printing. This step prevents mistakes and wasted materials.
I also prepare my inks. I choose between plastisol ink, which is durable and easy for beginners, or water-based ink, which feels softer and is more eco-friendly. I mix the ink to get the right color for my print.
Now I am ready to transfer my design onto the hoodie. I set up the screen on the printing press and place the hoodie flat underneath. I make sure the fabric is smooth and free of wrinkles.
Here is how I transfer the print:
I lower the screen onto the hoodie, making sure the stencil sits where I want the print.
I pour a line of ink at the top of the screen.
I use a squeegee to pull the ink across the screen. I press firmly so the ink goes through the stencil and onto the hoodie.
I lift the screen and check the print. If I want a brighter color, I repeat the process.
For multi-color prints, I use a flash cure unit to dry each layer before adding the next color.
When I finish printing, I cure the ink using a conveyor dryer or a heat press. I heat the print to about 320°F for 30 seconds if I use plastisol ink. This step makes the print last through many washes.
I use a heat gun or heat tape to check the temperature and make sure the print cures fully.
Note: I always clean my screens and tools right after printing. This keeps my equipment in good shape for the next project.
Screen printing lets me make many hoodies with the same design. The prints look bright, bold, and professional. I love seeing my artwork come to life on fabric. This method works best for solid graphics and large orders. When I want a custom hoodie that stands out, I trust screen printing to deliver the best results.
Setting and finishing steps help me make sure my custom hoodie looks great and lasts a long time. I always focus on durability and quality, so I follow these steps carefully.
Heat setting locks in the design and keeps it from peeling or fading. I use different methods for paint and vinyl.
When I use fabric paint on a hoodie, I follow these steps:
I preheat my heat press to about 320°F.
I place the hoodie flat and put a piece of parchment paper over the painted area.
I press down with medium pressure for 15-20 seconds.
I let the hoodie cool before touching the paint.
If I do not have a heat press, I use an iron set to cotton with no steam. I press firmly for 15-20 seconds. This step helps the paint bond to the fabric and improves quality.
For heat transfer vinyl (HTV), I use a similar process:
I preheat the heat press to 320°F to 365°F, depending on the vinyl type.
I place the vinyl design on the hoodie and cover it with a Teflon sheet.
I press with medium to firm pressure for 15-20 seconds.
I let the hoodie cool, then peel off the transfer film. Cold peel gives a smooth finish.
I wait 24-48 hours before washing or wearing the hoodie. This curing time helps the adhesive set and keeps the quality high.
Tip: I never iron directly on vinyl. I use a cloth barrier or turn the hoodie inside out and use low heat.
Taking care of a custom hoodie keeps the design and fabric looking new. I always follow these steps for the best results.
For the first wash, I:
Wait at least 24 hours after heat setting vinyl or paint.
Turn the hoodie inside out to protect the design.
Use cold water and a gentle cycle.
Avoid bleach and fabric softeners, which can damage the print and lower quality.
Air dry or use low heat in the dryer.
To keep my hoodie in top shape over time, I:
Always check the care label for special instructions.
Wash with mild detergent and avoid harsh chemicals.
Hand wash hoodies with sequins or beads using lukewarm water.
Spot-clean small stains instead of washing the whole hoodie often.
Lay flat or hang to air dry, away from direct sunlight.
Fold along seams and store in a cool, dry place.
Note: I close zippers and buttons before washing to protect decorations and keep the hoodie’s shape.
Adding final touches makes my custom hoodie stand out and feel special. These details show off my style and boost the quality.
I like to add labels for a professional look:
Main label: I sew this inside the back neck. It shows my brand and adds value.
Care label: I attach this at the side seam above the bottom hem. It lists size, fabric, and care tips. I use soft satin for comfort.
Hem tag: I sew a small tag on the hip or pocket. It has my logo and does not clutter the design.
I use special details to make my hoodie unique:
I protect heat-sensitive parts like zippers with a flexible pad during heat pressing.
I try different print locations, such as the left chest, hood, pocket, or sleeve.
I use dimensional patches, emblems, or special effect vinyl for extra flair.
I test placement with tape before final pressing to get the best look.
Tip: Small touches like custom tags or creative prints can turn a simple hoodie into a high-quality, one-of-a-kind piece.
Creating a custom hoodie that looks professional takes more than just creativity. I always use a few extra tricks to make sure my work stands out and lasts. Here are my best tips for clean lines, avoiding mistakes, and keeping your hoodie looking new.
When I want sharp edges on my design, I use painter’s tape or heat-resistant tape. I place the tape along the borders where I want the ink or paint to stop. This keeps lines crisp and prevents colors from bleeding. For screen printing, I tape the edges of the screen to stop ink leaks. Tape also helps when I use heat embossing, which presses raised patterns into the fabric. This technique gives the hoodie a premium look and makes the design pop.
Stencils help me get perfect shapes and letters. I cut stencils from plastic or thick paper and lay them flat on the hoodie. I use a sponge or brush to dab paint inside the stencil. This method works well for repeating patterns or logos. Stencils keep the design neat and make it easy to match both sides of the hoodie. For a more textured finish, I sometimes combine stencils with embroidery or embossing.
Tip: Embroidery adds a long-lasting, textured look. It works best for bold logos and simple shapes. I avoid thin lines because they can get lost in the stitches.
Technique | Description | Best For |
|---|---|---|
Screen Printing | Ink through stencil for bold graphics | Clean lines, large designs |
Embroidery | Stitches design into fabric | Small logos, premium finishes |
Heat Transfer | Pre-printed graphics applied with heat | Detailed, multi-color designs |
Direct-to-Garment (DTG) | Prints images directly onto fabric | Photo-quality, complex designs |
Hybrid Designs | Combines two or more methods | Unique, standout custom hoodies |
Before I finish a custom hoodie, I always test my design. I print a sample and wear it to see how it looks. I take photos in different lighting and angles. Sometimes, I ask friends for feedback or use online mockup tools like Canva or Adobe Express. For small batches, I use heat transfer or DTG printing to check colors and placement. Testing helps me spot problems before they become permanent.
Good placement makes a hoodie look professional. I use tape or chalk to mark where the design will go. I double-check the position before pressing or stitching. I look at the hoodie from the front, back, and sides to make sure everything lines up. If I am not sure, I ask for a second opinion or use a digital mockup.
Note: Testing and careful placement save time and materials. I always check twice before making it final.
Proper storage keeps my custom hoodie looking fresh. I fold it neatly and avoid creasing the printed area. I store hoodies in a cool, dry place away from sunlight. I use wide or padded hangers if I hang them, never thin wire hangers. For long-term storage, I place acid-free tissue paper between layers and use breathable garment bags. I make sure the hoodie is dry before storing to prevent mold.
Store in cool, dry places away from sunlight
Use padded hangers or fold carefully
Avoid stacking too many hoodies together
Use breathable bags and acid-free tissue paper
When my hoodie gets damaged, I fix it right away. For small holes, I sew a patch over the spot. I use fabric glue or markers to touch up cracked prints. If the print peels, I use a heat press with a cloth to re-adhere it. I always wash my hoodie in cold water, turn it inside out, and air dry it to keep the design safe. For big repairs, I use matching fabric and simple stitches like running stitch or darning.
Tip: Quick repairs and gentle washing help my custom hoodie last for years.
After I finish making a custom hoodie, I always want to show it off. Sharing my work helps me connect with others and get feedback. I use both photos and social media to showcase my creations. Here is how I do it.
Taking good photos makes a big difference. Clear, bright pictures help my hoodie stand out. I pay attention to lighting and angles to capture every detail.
I always use natural light when I can. I take photos near a window or outside on a cloudy day. This gives soft, even light and shows the true colors of my hoodie. If I need to shoot indoors, I use a lamp with a white bulb. I avoid harsh shadows and yellow light. Sometimes, I use a piece of white paper or a reflector to bounce light onto the hoodie. This trick helps remove dark spots and makes the fabric look smooth.
Tip: I take photos in the morning or late afternoon for the best natural light.
I take photos from different angles to show off my work. I start with a straight-on shot of the front. Then, I take a picture of the back and close-ups of any special details. I also try side angles to highlight the fit and shape. Sometimes, I ask a friend to wear the hoodie so I can show how it looks on a real person. I use a simple background so the focus stays on my design.
Front view: Shows the main design
Back view: Highlights large prints or embroidery
Close-up: Captures texture and small details
Side view: Shows fit and sleeve designs
Sharing my hoodie online helps me reach more people. I use different platforms and join communities to connect with other creators.
I post my photos on Instagram, Pinterest, and TikTok. Instagram works well for stylish photos and short videos. Pinterest lets me create boards to organize my designs. TikTok is great for showing the making process in quick clips. I use hashtags like #customhoodie or #diyfashion to help others find my posts. Sometimes, I share my work in Facebook groups for crafters or fashion lovers.
Platform | Best For | Tips |
|---|---|---|
Photos, short videos | Use hashtags, tag brands | |
Inspiration boards | Pin step-by-step guides | |
TikTok | Quick tutorials | Show before-and-after shots |
I join online groups and forums to share my hoodie and get advice. I comment on other people’s posts and ask questions. This helps me learn new tips and make friends who like the same things. Sometimes, I join local craft fairs or pop-up shops to show my hoodie in person. Meeting people face-to-face gives me new ideas and helps me grow my skills.
Note: Sharing my work helps me feel proud and inspires others to try making their own custom hoodie.
Making custom hoodies at home feels rewarding and creative. I follow these main steps:
I plan my hoodie’s purpose and gather ideas.
I pick the right fabric, fit, and color.
I design my artwork and choose the best printing or embroidery method.
I finish with care and store my hoodie properly.
Sometimes, I face challenges like fabric distortion or tricky embroidery settings. I solve these by testing and following step-by-step guides. I always try new methods and ask myself how much does it cost to make a custom hoodie. I love seeing what others create, so please share your results and inspire more ideas!
I look for fabric that feels soft and lasts long. Cotton works well for comfort. Polyester gives more durability. Blends offer both. I always check the fabric weight and stretch before I start.
Yes, I wash my custom hoodie inside out on a gentle cycle with cold water. I avoid bleach and strong detergents. I let it air dry or use low heat in the dryer to keep the design safe.
I use a Cricut machine for vinyl, fabric paint for hand designs, or embroidery tools for stitching. I also need a heat press or iron for setting vinyl. Good lighting and a clean workspace help me work better.
I always heat-set my design after applying vinyl or paint. I wait 24 hours before washing. I use gentle washing and avoid harsh chemicals. This keeps my custom hoodie looking new for a long time.
Yes, I can decorate a blank hoodie using vinyl, paint, or iron-on patches. I do not need to sew anything. I just need to follow the right steps for each decoration method.
If I make a small mistake, I use fabric markers or patches to cover it. For bigger errors, I test on scrap fabric first. I always double-check placement before making it final.
The cost depends on the fabric, tools, and design method. I usually spend $15–$40 for a blank hoodie. Extra materials like vinyl or paint add $5–$20. Sewing from scratch may cost more.
Yes, I can sell my custom hoodies. I make sure my designs do not copy other brands or copyrighted images. I use my own artwork or buy commercial-use graphics to stay safe.
By now, I believe you have gained a certain understanding of how this great designer customizes hoodies at home. Maybe you can also give it a try.
However, it should be noted that it is best for you to hire a professional as a consultant to solve your problems at any time.


 contact@aqii.group
 +86 13777583786
